MatMaker
MatMaker is free to use. A donation for the effort and follow-on development, however, would be very much appreciated! To donate via Stripe (all major credit cards accepted), please click on the donation link below.

![]()
Overview
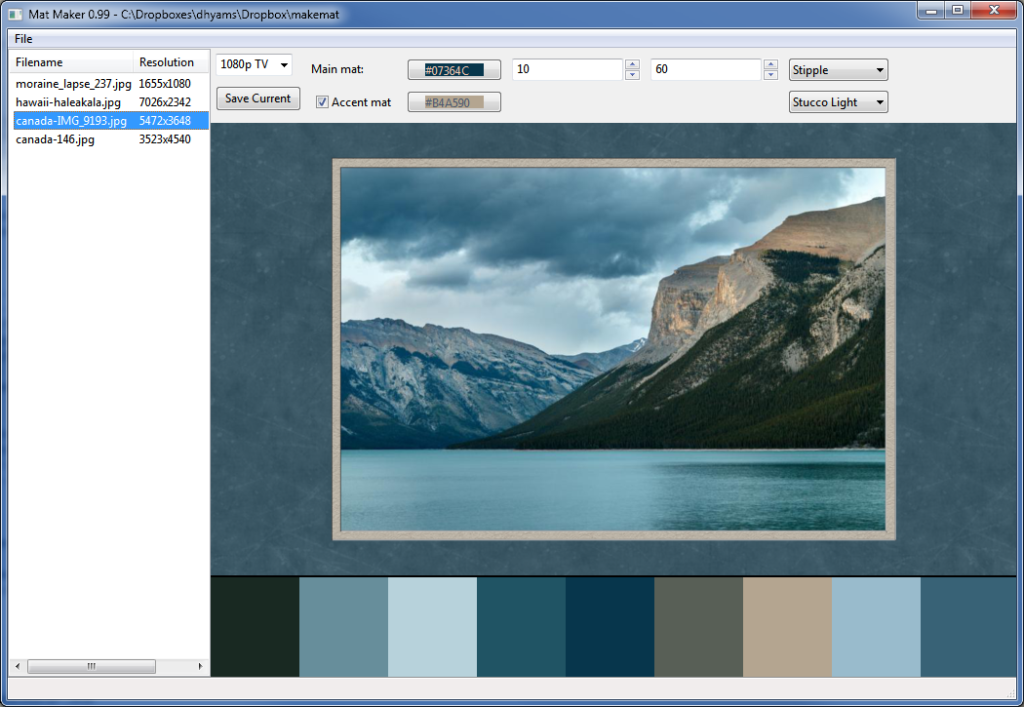
MatMaker is a free utility for creating digital mats around existing pictures. One of my hobbies is photography, and I created this tool for myself in order to display images as artwork on normal devices like TV’s, tablets, and phones. Here, the bezel of the device can reasonably act as a frame, and the digital matting is very effective to enhance the presentation of your photos. Also, you can use this tool to preview mat colors and textures before purchasing the real thing.
The most important features of MatMaker are listed below:
- supports single and double matting
- ability to pick the color of the main and accent mat directly from the picture
- the color palette for the image is calculated and shown, which assists in selection of the mat colors. Mat colors can be picked from the palette as well.
- Several textures available for the mats, and you can add your own textures if desired.
- Mat settings are saved persistently alongside the image
- good “initial guess” for a decent mat color for every image.
- Output of image is in a specific resolution, which is well suited for display on a particular device. 1080p and 4K resolutions are built-in (among several others), or you can specify your own resolution.
- output sharpening
This tool is available on Windows and Mac platforms. This is a beta-quality tool, so please be careful with your precious photographs; it is best to create a folder of pictures that you wish to place mats around, and then open this directory in the software.
Download
Mat Maker is compatible with all versions of Windows and macOS 10.7 and above (Lion to Sierra). Please see the documentation for how to generate beautiful custom mats with the software.
Documentation
There is no documentation that comes with the software, so its operation will be described here. If there is a significant interest in Mat Maker, I will spend the time to create in-application documentation, proper installers, and add new features as requested by users.
Installation
On windows, run the downloaded exe file. On a mac, open the downloaded dmg.
Operation
Open a Folder
First and most importantly, go to File->Open Folder, and select the folder that holds your images. This should populate the left panel with the image names, which you can then select in order to configure the matting for that picture.
Configure the mat
Now, set up how you want the mat to look. The color can be set in two ways; by clicking the color control buttons at the top (one color for the main mat, and one for the accent mat), or by directly clicking anywhere on the image. Left click for the main mat color, and right click for the accent mat color. Remember that you also left or right click on the palette displayed underneath the image.
The other mat controls are the thickness of the mat (smaller means thinner), and the color strength (smaller color strength means that more of the texture of the mat shows through). Also, you can choose the texture of the main and accent mats.
Select the Output Resolution and Output Sharpening
The resolution is width and height, in pixels, that the final matted image should be output in. A couple of typical choices are included (1080p and 4K, which is 1920×1080 and 3840×2160, respectively), but you can also key in your own resolution in the format “widthxheight”, for example, 1024×768.
Output sharpening is quite important for high-quality output of images that have been resized, as these images are. Typically, medium sharpening works well. You have the choice of no sharpening, light, medium, or heavy. The settings for each are listed below:
- USM radius 0.75, Amount 50%, Threshold 3
- USM radius 1.0, Amount 125%, Threshold 3
- USM radius 2.0, Amount 100%, Threshold 3
Write the new image(s)
There are several ways to write an image or images. First, you can click “Save Current”. Or, select a group of images in the left panel, and pick File->Process Some. Finally, you can select File->Process All to write out matted files for all images in the folder.
The new files will be written out to a new filename. If your picture is called “myimage.jpg”, the output file will be “myimage_matted_#color1_#color2.jpg”. This tool will not overwrite your existing images.
Miscellaneous Points
The image shown is a thumbnail of your original image, so therefore it may not be as detailed as your original image, obviously. The final output image will be based your original image with no loss of quality.
It can take some time to generate the previews. If you want to be able to move from image to image more quickly in the interface, select File->Generate Previews, which will go through your folder and generate the previews for all of the images there. In this sense, this tool works like Lightroom, in which you can pregenerate previews, but if there is no preview available, it will be automatically generated when you browse to the picture.
The previews are saved in a folder called “.previews” in any folder that you open with this tool. This .previews folder can be removed if you like.
The mat settings are saved in a folder called “.matsettings” in any folder that you open with this tool. You will probably want to save these settings, as they contain the all of the per-image mat settings that you have presumably worked on. As an analogy to Lightroom, these are the “sidecar” files that contain the settings for each image.
Screenshots